OK, first thing I always do is make a copy of my background layer and place it in a layer group called "Model." Hide the background layer. We're going to knock out everything but the model using the pen tool. Start a new path and trace around you model. Make sure you name your path so you can quit and come back to it if you need to. When I make my path, I usually stay a pixel or two inside the model to remove any fringe from my lens. In this example, my model is wearing feathery shorts. I'm ignoring the feathers and her hair for now, but I'm exact everywhere else. Also, do not include her shadows or reflections on the ground. We'll get to that later.

Once you have your basic path down, select it and create a layer mask for the layer group. Shift click the layer mask to hide it and go to your channels. Look at each of the channels and find the one with the best contrast between the hair and background. In my case, it was the green channel. Make a copy of this channel. Invert the new channel so the background is mostly black and the hair is mostly white. Select you paintbrush and set your foreground color to black and your flow to around 10 percent. Now set the mode to overlay (the brush mode). Paint black on the channel copy on the background of the image around the hair (and feather shorts in my case). You only need to focus on the areas you missed with the pen tool. Now switch your foreground color to white and paint over the hair until it looks like the image below.

Notice how I am only concentrating on the fringe of the hair. I've already masked out everything else.
Ctrl-click the channel to select it. Switch back to your layer group and shift-click the mask to activate it. Using white as your foreground, paint the hair back in. You may need to bring your flow back up to 100 percent, though I like to keep it low and use short brush strokes. You should now have a cutout of your model. Let's get the shadow and reflection now.

Duplicate your background layer again and rename it "Shadow." Place it under the "Model" layer group (not inside it). I removed the color from mine by hitting ctrl-shift-u but you can leave in any color if you like. Change the blend mode to multiply and add a layer mask. Hit ctrl-i to fill your mask with black. Now, using a soft white brush, paint in the areas that have the natural shadow. If your floor is too dark, use levels on the Shadow layer to brighten the whites a bit. All you need is a hint of the shadow to ground your model.

Next, create 2 solid color adjustment layers under your shadow layer. The one on top should be white and the one on the bottom should be your main color, in this case a light purple. Add a layer mask to your white layer so that only a soft round area appear behind your subject's head. Really, the main reason for this is to hide any flaws in the hair.
Your pin-up photo should look something like this now.
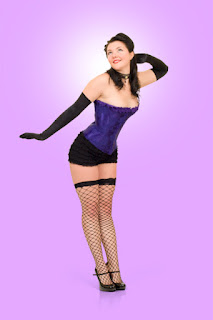 You really could stop here and you've got yourself a pretty good pin-up. With the right use of lighting and props, this might be all you need. It's a good place for me to stop today. Part 3 will cover some special effects to give your pin-up photo that pop it needs.
 You really could stop here and you've got yourself a pretty good pin-up. With the right use of lighting and props, this might be all you need. It's a good place for me to stop today. Part 3 will cover some special effects to give your pin-up photo that pop it needs.
Part 3


 Posts
Posts

