Sunday, August 22, 2010

New surf photos

These were taken on Saturday, Aug. 21, 2010.

After the Ride


Saturday, August 21, 2010

Attention surfers


I've been down at Steamer Lane in Santa Cruz a lot this week thanks to the new lenses my aunt and uncle are lending me. If you happen to find yourself rippin' a killer set and see a goofy-looking guy up on the cliff with a big white lens, well, chances are I got a photo of you. If you'd like to scroll through all my photos and maybe buy a print or two of yourself, just click http://solisphotography.org/steamer8-20-2010 for Aug. 20, 2010. Just change the date at the end of that address to whatever date you were out there. It will usually take me a day or two to get the photos up, so be patient. If you'd like to ask me if I was out on a particular day, or want to see if I plan on going out, just e-mail me at tony@solisphotography.org. I think I'll keep the photos up for a month or two, but I can always look through my archives if you need me to.

Sunday, August 08, 2010

How to shoot a pin-up, part 3

This has been a long time coming, so I hope you aren't disappointed with how simple and basic this is. I've already showed you how to light a pin-up and how to extract a pin-up from the background. Here's where you get that "look."

I first discovered this trick while learning about HDR photography and I had read that a few photographers were using it for portraits, so I decided to give it a try.

First off, after you have your extracted image, do any touch-ups to skin blemishes you see. You can use the clone stamp tool in Photoshop or the healing brush or whatever aftermarket plugin you normally use. This is also the point where I would fix some color issues with make-up or clothing. Maybe I make the lips a little darker, add blush to the cheeks or just even out the skin tone. It all varies from photo to photo.

Next up, dodge and burn. I make a duplicate layer to work on in case I make any mistakes. Select the burn tool and set it to shadows with a low opacity. Lightly go over any parts of the photo you want to define like wrinkles in clothing, cheek bones, arms and breasts. Remember, usually when things start to angle away from you, they appear darker. Now switch to the dodge tool and set it to either highlights or midtones and go over the areas to want to brighten up. On clothing, this may be right next to where you burned some shadows in the previous step. This gives your photo a 3D quality. Now for the real trick.

Close and save your photo and find it in Adobe Bridge or Adobe Lightroom. Open the image as a Smart Object. Once back in Photoshop, right click on the layers pallet and select New Smart Object Via Copy. Your Layers Pallet should look like this:
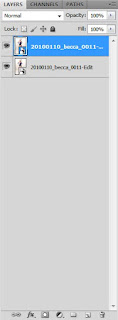

Double click the bottom layer and Adobe Camera Raw will come up. On the right you will see a bunch of sliders. Lower the contrast all the way and increase the fill light until you start to notice posterization around the edges (you'll know it when you see it because it looks bad). Click OK.

Double click the top layer and do the same thing (contrast and fill light) only this time, also convert it to grayscale. Do this by selecting the fourth tab and clicking the convert to grayscale button. Press OK.

Back in Photoshop, change the top layer's blend mode to Overlay. You should now see the effect in full force. You will most definitely have to fine-tune the image as it may appear too washed out. Simply double click each layer and play with the sliders until you get a combination you like. One tip though: Go into your grayscale layer and go back to that fourth tab. If you adjust the orange, red and yellow sliders to the left, you will darken the skin and prevent it from looking washed out.

That's just one of the many tricks I use on my pin-ups. Remember, there's no magic button that will give you the look you want, just a series of steps in the right direction. If you have any questions, you can e-mail me at tony@solisphotography.org or follow me on Facebook.

Tuesday, April 27, 2010

How to shoot a pin-up, part 2

Now that you've taken your pinup photo, it's time to do some processing. It's important to know that there is really no right way to process pinup photos. You just got to experiment until you get it looking the way you want. This tutorial is not for beginners. I'm assuming you have a basic understanding of layers, masks, paths and filters. You've been warned.

OK, first thing I always do is make a copy of my background layer and place it in a layer group called "Model." Hide the background layer. We're going to knock out everything but the model using the pen tool. Start a new path and trace around you model. Make sure you name your path so you can quit and come back to it if you need to. When I make my path, I usually stay a pixel or two inside the model to remove any fringe from my lens. In this example, my model is wearing feathery shorts. I'm ignoring the feathers and her hair for now, but I'm exact everywhere else. Also, do not include her shadows or reflections on the ground. We'll get to that later.


Once you have your basic path down, select it and create a layer mask for the layer group. Shift click the layer mask to hide it and go to your channels. Look at each of the channels and find the one with the best contrast between the hair and background. In my case, it was the green channel. Make a copy of this channel. Invert the new channel so the background is mostly black and the hair is mostly white. Select you paintbrush and set your foreground color to black and your flow to around 10 percent. Now set the mode to overlay (the brush mode). Paint black on the channel copy on the background of the image around the hair (and feather shorts in my case). You only need to focus on the areas you missed with the pen tool. Now switch your foreground color to white and paint over the hair until it looks like the image below.


Notice how I am only concentrating on the fringe of the hair. I've already masked out everything else.

Ctrl-click the channel to select it. Switch back to your layer group and shift-click the mask to activate it. Using white as your foreground, paint the hair back in. You may need to bring your flow back up to 100 percent, though I like to keep it low and use short brush strokes. You should now have a cutout of your model. Let's get the shadow and reflection now.

Duplicate your background layer again and rename it "Shadow." Place it under the "Model" layer group (not inside it). I removed the color from mine by hitting ctrl-shift-u but you can leave in any color if you like. Change the blend mode to multiply and add a layer mask. Hit ctrl-i to fill your mask with black. Now, using a soft white brush, paint in the areas that have the natural shadow. If your floor is too dark, use levels on the Shadow layer to brighten the whites a bit. All you need is a hint of the shadow to ground your model.

Next, create 2 solid color adjustment layers under your shadow layer. The one on top should be white and the one on the bottom should be your main color, in this case a light purple. Add a layer mask to your white layer so that only a soft round area appear behind your subject's head. Really, the main reason for this is to hide any flaws in the hair.

Your pin-up photo should look something like this now.

You really could stop here and you've got yourself a pretty good pin-up. With the right use of lighting and props, this might be all you need. It's a good place for me to stop today. Part 3 will cover some special effects to give your pin-up photo that pop it needs.


Part 3

This blog has moved


This blog is now located at http://solisphotography.blogspot.com/.
You will be automatically redirected in 30 seconds, or you may click here.

For feed subscribers, please update your feed subscriptions to
http://solisphotography.blogspot.com/feeds/posts/default.