There are many tutorials online on how to shoot pin-ups and how to shoot against a white backdrop, so this will simply borrow from those and modified for what works for me.
THE SHOOT
The look I'm trying to get is that of a Vargas painting, so it helps to have a printout of poses to go for. Some, I've found are impossible for the average person. The body simply doesn't bend in real life the way it can in a drawing, so that's something to be aware of. Get yourself an Alberto Vargas book or search for images online.
I try to use a 50mm lens whenever I have the room to do so. For the average digital camera, this is the focal length that most closely resembles human sight. I don't want too much compression and I don't want to go too wide. I've used a wide-angle zoom when I didn't have enough room to use the 50mm, but I always tried to stay as close to 50mm as I could.
One of the many things to remember while you are shooting is to try to keep the front of the lens parallel to your subject to avoid distortion. And don't shoot from a standing position. Shoot from waste-high or even lower. This varies from subject to subject and depends on the pose.
During the shoot, have some music playing and try to keep things light. This should be fun for the both of you. A glass of wine helps loosen things up a bit, but always go with white since red wine will stain the teeth and tongue.
LIGHTING
Since we are trying to copy the look of a drawing, the lighting scheme we are going for is flat. This will fill in the shadows on the face and body and allow you to use your post-processing to get that painted look. If you will not be doing extensive post production, then you should light your photos how you see fit. One idea would be to use a color backdrop with a light pointed at the spot behind your subject's head and another light hitting her side from behind her for a nice rim light. This will give her a more 3-D look without having to do any post work.

Above is the lighting diagram for the scheme I use. I angled the two rear lights so that the backdrop meters two stops brighter than the subject using the reflective method (if using a white backdrop). In the above case, that means the backdrop metered at f/22. The subject metered at f/11 both from the front and rear using an incident meter. This is important to help prevent light spill over the edges of your subject. If you can't get your backdrop pure white, don't worry. In post we will drop the backdrop out. In a pinch, the rear lights are optional.
For my backdrop, I'm simply using a painter's drop. It's about $6 at home depot and I have one taped to the wall and one on the floor. Also on the floor is a 4' x 8' white tile board. It's $11 at Home Depot and is great for capturing shadows and reflection.
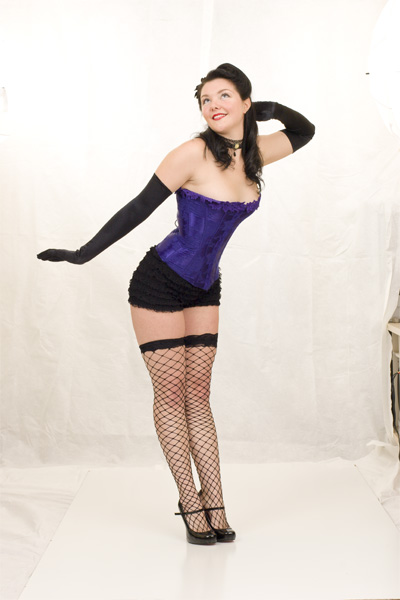
I shot this photo at 1/125, f/11, 100 ISO. If you are wondering why I chose to meter and shoot at f/11, it's because I wanted the entire subject to be sharp. F/16 would be even sharper, but I wanted to save a stop of light energy. Plus, my sensor was a little dirty and the dirt shows more the higher the f-stop number.
I shoot all my photos in RAW and catalog them in Adobe Lightroom. Normally, I do a lot of color correction in Lightroom but for pin-ups, I use Photoshop. The only thing I did in Lightroom to the below photo was lift the exposure 1/2 stop and use a medium contrast tone curve. Everything else is the Lightroom default, so the below image is pretty much straight out of the camera.
Part 2
Part 3

