This has been a long time coming, so I hope you aren't disappointed with how simple and basic this is. I've already showed you how to light a pin-up and how to extract a pin-up from the background. Here's where you get that "look."
I first discovered this trick while learning about HDR photography and I had read that a few photographers were using it for portraits, so I decided to give it a try.
First off, after you have your extracted image, do any touch-ups to skin blemishes you see. You can use the clone stamp tool in Photoshop or the healing brush or whatever aftermarket plugin you normally use. This is also the point where I would fix some color issues with make-up or clothing. Maybe I make the lips a little darker, add blush to the cheeks or just even out the skin tone. It all varies from photo to photo.
Next up, dodge and burn. I make a duplicate layer to work on in case I make any mistakes. Select the burn tool and set it to shadows with a low opacity. Lightly go over any parts of the photo you want to define like wrinkles in clothing, cheek bones, arms and breasts. Remember, usually when things start to angle away from you, they appear darker. Now switch to the dodge tool and set it to either highlights or midtones and go over the areas to want to brighten up. On clothing, this may be right next to where you burned some shadows in the previous step. This gives your photo a 3D quality. Now for the real trick.
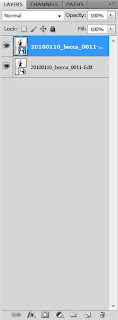
Close and save your photo and find it in Adobe Bridge or Adobe Lightroom. Open the image as a Smart Object. Once back in Photoshop, right click on the layers pallet and select New Smart Object Via Copy. Your Layers Pallet should look like this:
Double click the bottom layer and Adobe Camera Raw will come up. On the right you will see a bunch of sliders. Lower the contrast all the way and increase the fill light until you start to notice posterization around the edges (you'll know it when you see it because it looks bad). Click OK.
Double click the top layer and do the same thing (contrast and fill light) only this time, also convert it to grayscale. Do this by selecting the fourth tab and clicking the convert to grayscale button. Press OK.
Back in Photoshop, change the top layer's blend mode to Overlay. You should now see the effect in full force. You will most definitely have to fine-tune the image as it may appear too washed out. Simply double click each layer and play with the sliders until you get a combination you like. One tip though: Go into your grayscale layer and go back to that fourth tab. If you adjust the orange, red and yellow sliders to the left, you will darken the skin and prevent it from looking washed out.
That's just one of the many tricks I use on my pin-ups. Remember, there's no magic button that will give you the look you want, just a series of steps in the right direction. If you have any questions, you can e-mail me at tony@solisphotography.org or follow me on
Facebook.


 Double click the bottom layer and Adobe Camera Raw will come up. On the right you will see a bunch of sliders. Lower the contrast all the way and increase the fill light until you start to notice posterization around the edges (you'll know it when you see it because it looks bad). Click OK.


